こんにちは、インフラエンジニアのryuです。
今回は、AppService証明書をpfx形式でエクスポートする方法を解説します。pfx形式でエクスポートするためには、powershellを使用します。powershellのスクリプトを使用し、エクスポートしましょう。手順を1から解説します。
目次
AppService証明書をpfx形式でエクスポートする方法を解説
AppService証明書で購入した証明書を秘密鍵付きのpfx形式でエクスポートするには、powershellのスクリプトを使用します。
Azureのポータルサイトからでは、エクスポートできません。
エクスポートするスクリプトは以下のサイトに記載されています。
全て英語で良くわかりません。私も解読するのに苦労しました。さらに、powershellでスクリプトを動かすために、いくつかのコマンドが必要ですが、その記載もありませんでした。
なので、今回は、AppService証明書をpfx形式でエクスポートする方法を1から解説します!
手順①.powershellを管理者権限で起動する。
まず、powershellを管理者権限で起動しましょう。後に入力するコマンドは管理者権限でしか実行できないからです。
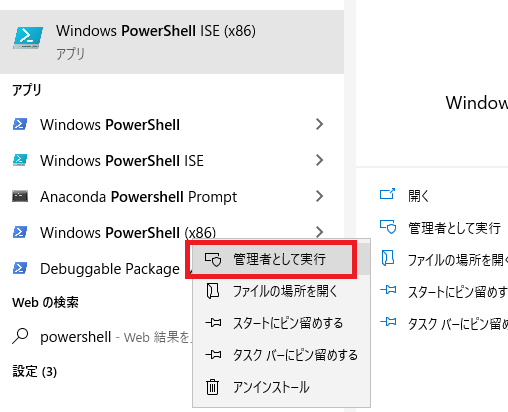
管理者権限でpowershellを起動する方法は、スタート画面から「powershell」と検索し、右クリックから”管理者として実行する”をクリックします。スクリプトを実行しやすいpowershell ISEを起動します。

手順②. powershellでスクリプトの実行を許可する
次にpowershellでコマンドを実行します。
まず、“powershellでスクリプトの実行を許可する”コマンドを入力します。
powershellはデフォルトでスクリプトの実行は許可されていません。以下のコマンドを入力します。powershellを管理者として起動していないとエラーが表示されます。
>Set-ExecutionPolicy bypass
手順③.powershellにAzureのモジュールをインポートする
次に powershellにAzureのモジュールをインポートするコマンドを入力します。
スクリプト内には、Azureのコードが書かれているため、実行するためにはモジュールをインポートする必要があります。
以下のコマンドを入力します。
Install-Module -Name AzureRM -AllowClobber
Azureのモジュールについて詳しく知りたい方は、ドキュメントを参考にしてください。
https://docs.microsoft.com/ja-jp/powershell/azure/azurerm/install-azurerm-ps?view=azurermps-6.13.0
手順④.スクリプトの実行
最後にスクリプトの実行です。
先ほど、記載した英語のページより、スクリプトを以下のようにコピーします。
Param(
[Parameter(Mandatory=$true,Position=1,HelpMessage="ARM Login Url")]
[string]$loginId,

[Parameter(Mandatory=$true,HelpMessage="Subscription Id")]
[string]$subscriptionId,

[Parameter(Mandatory=$true,HelpMessage="Resource Group Name")]
[string]$resourceGroupName,

[Parameter(Mandatory=$true,HelpMessage="Name of the App Service Certificate Resource")]
[string]$name
)

###########################################################

Login-AzureRmAccount
Set-AzureRmContext -SubscriptionId $subscriptionId

## Get the KeyVault Resource Url and KeyVault Secret Name were the certificate is stored
$ascResource= Get-AzureRmResource -ResourceId "/subscriptions/$subscriptionId/resourceGroups/$resourceGroupName/providers/Microsoft.CertificateRegistration/certificateOrders/$name"
$certProps = Get-Member -InputObject $ascResource.Properties.certificates[0] -MemberType NoteProperty
$certificateName = $certProps[0].Name
$keyVaultId = $ascResource.Properties.certificates[0].$certificateName.KeyVaultId
$keyVaultSecretName = $ascResource.Properties.certificates[0].$certificateName.KeyVaultSecretName

## Split the resource URL of KeyVault and get KeyVaultName and KeyVaultResourceGroupName
$keyVaultIdParts = $keyVaultId.Split("/")
$keyVaultName = $keyVaultIdParts[$keyVaultIdParts.Length - 1]
$keyVaultResourceGroupName = $keyVaultIdParts[$keyVaultIdParts.Length - 5]

## --- !! NOTE !! ----
## Only users who can set the access policy and has the the right RBAC permissions can set the access policy on KeyVault, if the command fails contact the owner of the KeyVault
Set-AzureRmKeyVaultAccessPolicy -ResourceGroupName $keyVaultResourceGroupName -VaultName $keyVaultName -UserPrincipalName $loginId -PermissionsToSecrets get
Write-Host "Get Secret Access to account $loginId has been granted from the KeyVault, please check and remove the policy after exporting the certificate"

## Getting the secret from the KeyVault
$secret = Get-AzureKeyVaultSecret -VaultName $keyVaultName -Name $keyVaultSecretName
$pfxCertObject= New-Object System.Security.Cryptography.X509Certificates.X509Certificate2 -ArgumentList @([Convert]::FromBase64String($secret.SecretValueText),"",[System.Security.Cryptography.X509Certificates.X509KeyStorageFlags]::Exportable)
$pfxPassword = -join ((65..90) + (97..122) + (48..57) | Get-Random -Count 50 | % {[char]$_})
$currentDirectory = (Get-Location -PSProvider FileSystem).ProviderPath
[Environment]::CurrentDirectory = (Get-Location -PSProvider FileSystem).ProviderPath
[io.file]::WriteAllBytes(".\appservicecertificate.pfx",$pfxCertObject.Export([System.Security.Cryptography.X509Certificates.X509ContentType]::Pkcs12,$pfxPassword))

## --- !! NOTE !! ----
## Remove the Access Policy required for exporting the certificate once you have exported the certificate to prevent giving the account prolonged access to the KeyVault
## The account will be completely removed from KeyVault access policy and will prevent to account from accessing any keys/secrets/certificates on the KeyVault,
## Run the following command if you are sure that the account is not used for any other access on the KeyVault or login to the portal and change the access policy accordingly.
# Remove-AzureRmKeyVaultAccessPolicy -ResourceGroupName $keyVaultResourceGroupName -VaultName $keyVaultName -UserPrincipalName $loginId
# Write-Host "Access to account $loginId has been removed from the KeyVault"

# Print the password for the exported certificate
Write-Host "Created an App Service Certificate copy at: $currentDirectory\appservicecertificate.pfx"
Write-Warning "For security reasons, do not store the PFX password. Use it directly from the console as required."
Write-Host "PFX password: $pfxPassword"
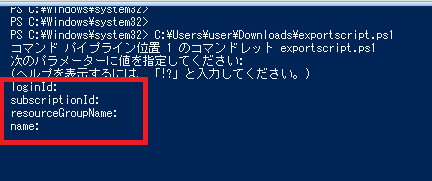
スクリプトを実行すると、4つの項目について聞かれます。

- loginId: →azureにログインするアカウント名
- subscriptionId: →サブスクリプションのId
- resourceGroupName: →証明書を格納しているリソースグループの名前
- name: →証明書の名前
自分の環境に合わせて入力しましょう。
実行が成功すると、以下のように証明書のエクスポート先のパスと証明書をインポートするときのパスワードが表示されます。

パスワードはエクスポートしたときのみ表示されるので、メモしておきましょう。
以上で手順の解説を終わります。
さいごに
今回は、AppService証明書をpfx形式でエクスポートする方法を解説しました。公式ブログにスクリプトは載っていましたが、詳しい手順が分からず、エクスポートに苦労しました。Azureを使用していく中で、手順が詳しく書いていないようなものがあったら、解説記事を投稿していきたいと思います。


